Email signatures have a size limit of 10,000 characters in the HTML. The plugin will warn you after exporting your email signature if its over the size limit. To avoid this you can use some of the Signature starter components under the Footer tab in the Emailify plugin.
Unfortunately, any responsive mobile overrides won't be rendered for any "HTML Email Signature" exports, as any CSS style tags and @media queries are stripped out by email clients (therefore, it's also not included in the code export), so it's worth trying to strike a balance in the original design that looks nice across both desktop and mobile widths.
 Video Tutorial: Design and export HTML Email Signatures from Figma
This video tutorial is a complete step-by-step guide showing you how to design and export production-ready, responsive HTML email from Figma using the Emailify plugin.
Export your HTML signature from Emailify
In the Emailify plugin, click on the Export HTML button to open the export panel, select the HTML Email Signature option from the dropdown list, then click the Export to HTML Signature button to start exporting the emails you've selected from Figma to HTML.
After Emailify has finished processing your email(s), you'll be shown a confirmation message; you can download your .zip file to your computer by clicking the Download your .zip file button, then you can unzip the .zip to see your exported files.
Copy your HTML email signature to the clipboard
After you've exported your HTML email signature from Emailify and unzipped the .zip file, you can open the preview-and-install.html file in your Google Chrome web browser (as other browsers like Safari may have issues) and then click the Copy HTML Signature button on the preview page, which will automatically copy the contents of your HTML signature to your clipboard.
Some email clients may require the "raw" HTML code, so if that's the case, you can click the Copy HTML Signature (Raw Code) button in the preview-and-install.html file to copy the selection as raw HTML to your clipboard that way instead.
Once you've copied the HTML to your clipboard, you can follow the instructions below (taken from the excellent guides provided by SignatureHound) to install the signature in your email client.
How to install your HTML email signature in Gmail (iOS)

- To have email sent via the Gmail iOS App use your custom signature you'll need to first install your signature on your webmail account.
If you haven't set up your custom signature in your Gmail webmail account yet, please follow the Gmail Webmail instructions first.
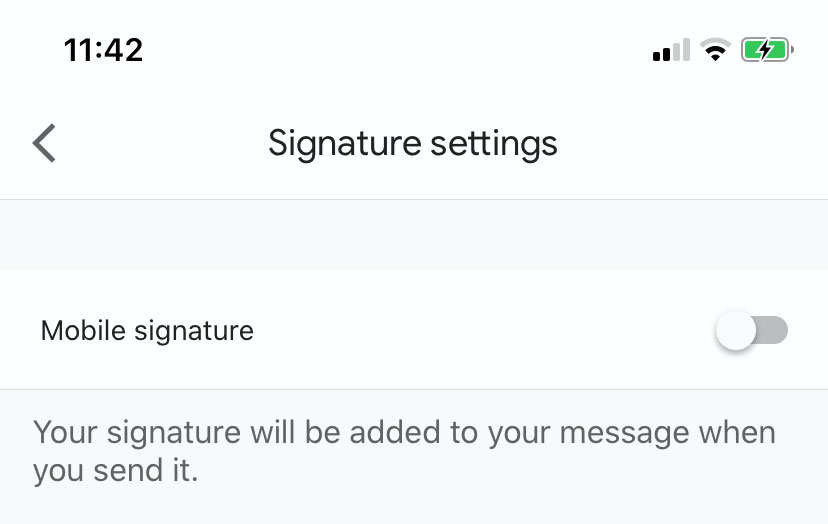
- In the Gmail App you need to ensure that the mobile signature option is turned off. To turn this off, click the Menu Icon click Settings, select your Gmail Account, Signature Settings, and set the Mobile Signature toggle to Off.
- Send an email to yourself to ensure the signature appears.
The signature will not be visible in the email composer. The only way to test it is working is to send yourself an email.
Troubleshooting signatures not showing up in the Gmail iOS app
Once you've installed the signature to your webmail account it can take a while until it starts sending via the Gmail app.
We were able to get our signature to show up immediately by switching to another Gmail account and then switching back to our main account through the app.
We also found that removing our account from the app and then re-adding it resulted in our new signature loading instantly.
Still not showing up? Please ensure that you've selected your signature as the For New Emails Use drop down option in your Gmail webmail settings – view the Gmail Webmail instructions.